RHEL系Linux にPostgreSQLをインストールしてpgbenchで性能検証を行う方法を紹介します。
RHEL系Linuxとは、本家のRed Hat Enterprise Linuxとその互換OSであるCentOS、Rocky Linux、AlmaLinuxのことです。
Rocky Linux 8とPostegreSQL 15で動作確認しました。
PostegreSQLのインストール
事前準備
古いPostgreSQLがインストール済みの場合は、アンインストールします。
$ cat /etc/redhat-release
Rocky Linux release 8.7 (Green Obsidian)
$ rpm -qa | grep postgres
$ rpm -e XXXX
PostgreSQLのyumリポジトリをインストール
<RHEL7系>
yum -y install https://download.postgresql.org/pub/repos/yum/reporpms/EL-7-x86_64/pgdg-redhat-repo-latest.noarch.rpm
<RHEL8系>
yum -y install https://download.postgresql.org/pub/repos/yum/reporpms/EL-8-x86_64/pgdg-redhat-repo-latest.noarch.rpm
<RHEL9系>
yum -y install https://download.postgresql.org/pub/repos/yum/reporpms/EL-9-x86_64/pgdg-redhat-repo-latest.noarch.rpm
PostgreSQLのインストール
PostgreSQLをインストールします。
RHEL8/9では、yumではなくdnfを使うのが一般的なので、dnfコマンドを使います。
# dnf install -y https://download.postgresql.org/pub/repos/yum/reporpms/EL-8-x86_64/pgdg-redhat-repo-latest.noarch.rpm
次のコマンドで、標準で組み込まれているPostgreSQLのインストールを無効化します。
# dnf -qy module disable postgresql
インストール候補を検索してみると、postgresql15-serverが表示されたのでインストール
# dnf search -qy postgresql*-server
================ 名前 一致: postgresql*-server =============
postgresql13-server.x86_64 : The programs needed to create and run a PostgreSQL server
postgresql14-server.x86_64 : The programs needed to create and run a PostgreSQL server
postgresql15-server.x86_64 : The programs needed to create and run a PostgreSQL server
===========
# dnf install -y postgresql15-server
# dnf install -y postgresql15-contrib
PostgreSQLを自動起動させるために以下のコマンドを実行します。
# systemctl enable postgresql-15.service
拡張機能で必要なライブラリ(参考)
PostgreSQL12や13では、LLVM関連のライブラリのインストールが必要な場合があるので紹介します。
PostegreSQLのバージョン12からpostgresXX-develをインストールするのにLLVM関連のライブラリが必要となりました。
postgresXX-develは拡張機能をコンパイルするときに使用します。
PostgreSQLを動かすだけなら必ずしもインストールする必要はありません。
EPEL(Extra Packages for Enterprise Linux)と Software Collections (SCL) は
PostgreSQLを動かすだけなら必ずしもインストールする必要はありません。
yumでリポジトリを追加します。/etc/yum.repos.d/CentOS-SCL.repo が追加されます。
# yum -y install epel-release centos-release-scl
PostreSQLの設定変更
デフォルトのデータディレクトリだとディスクの空きが不足したり、本番のディスクパーティションと異なる場合は変更します。
データベースクラスタの作成
データベースクラスタを作成します。
データベースのファイルはデフォルトで「/var/lib/pgsql/15/data/」に作成されます。
ディスクの空き容量が少ない場合は別ディレクトリに変更しましょう。
今回は「/pg-data/」に変更しています。
$ mkdir /pg-data
$ chown postgres /pg-data
$ chgrp postgres /pg-data
$ chmod 700 /pg-data
ディレクトリの作成は事前に必要です。
postgresql-15.serviceファイルの「PGDATA」環境変数によって指定します。
# vi /usr/lib/systemd/system/postgresql-15.service
変更前)
Environment=PGDATA=/var/lib/pgsql/15/data/
変更後)
Environment=PGDATA=/pg-data/
# Location of database directory
#Environment=PGDATA=/var/lib/pgsql/15/data/
Environment=PGDATA=/pg-data/
ディレクトリの権限(パーミッション)は以下。
$ ls -ltrF /var/lib/pgsql/
rwx—— 4 postgres postgres 4096 2月 11 08:24 15/
$ ls -ltrF /var/lib/pgsql/15
drwx—— 2 postgres postgres 4096 2月 9 20:18 data/
drwx—— 2 postgres postgres 4096 2月 9 20:18 backups/
drwx—— 4 postgres postgres 4096 2月 11 08:24 15/
設定をリロード(再読み込み)
# systemctl daemon-reload
次にデータベースクラスタを作成するために以下のコマンドを実行します。
# PGSETUP_INITDB_OPTIONS='-E UTF8 --no-locale' /usr/pgsql-15/bin/postgresql-15-setup initdb
Initializing database … OK
# ls -l /pg-data/
-rw——- 1 postgres postgres 3 2月 11 11:35 PG_VERSION
drwx—— 5 postgres postgres 4096 2月 11 11:35 base
drwx—— 2 postgres postgres 4096 2月 11 11:35 global
drwx—— 2 postgres postgres 4096 2月 11 11:35 log
-rw——- 1 postgres postgres 4548 2月 11 11:35 pg_hba.conf
-rw——- 1 postgres postgres 1636 2月 11 11:35 pg_ident.conf
:
-rw——- 1 postgres postgres 28054 2月 11 11:35 postgresql.conf
postgresアカウントの環境設定
PostgreSQLサーバの起動など、いろいろな操作をpostgresアカウントだけで実行できるように環境設定します。
起動前にPostgreSQLのbinディレクトリをパスに追加します。
postgresアカウントに切り替えて、postgresアカウントで作業を行います。
# su – postgres
/var/lib/pgsql/.bash_profile に PATHとPGDATAを追加します。
$ vi /var/lib/pgsql/.bash_profile
# binディレクトリをパスに追加
PATH=/usr/pgsql-15/bin:$PATH
export PATH
#PGDATAを変更
#PGDATA=/var/lib/pgsql/15/data
PGDATA=/pg-data
PS1=’\[\e[1;36m\][\d \t \u@\h \w]\$\[\e[m\] ‘ #これはオマケ
alias l=’ls -trlF’
profileを再読み込み
# source ~/.bash_profile
PostgreSQLの起動は、postgresアカウントで「pg_ctl start」を実行します。
(いちいちrootで操作するのが面倒なのと、性能測定でPostgreSQLの起動・停止を行いたいので)
root権限でサービス起動「systemctl start postgresql-15」でも可能です。
# systemctl -a | grep postgres
postgresql-15.service loaded inactive dead PostgreSQL 15 database server
postgresアカウントで操作したいので、
$ pg_ctl start
———
サーバの起動完了を待っています….2023-02-11 11:37:05.466 JST [4069] LOG: redirecting log output to logging collector process
2023-02-11 11:37:05.466 JST [4069] HINT: Future log output will appear in directory “log”.
完了
サーバ起動完了
———
データベースの確認
psqlコマンドを使います。
$ psql -V
psql (PostgreSQL) 15.2
$ psql -l
データベース一覧
名前 | 所有者 | エンコーディング | 照合順序 | Ctype(変換演算子) | アクセス権限
———–+———-+——————+———-+——————-+———————–
postgres | postgres | UTF8 | C | C |
template0 | postgres | UTF8 | C | C | =c/postgres +
| | | | | postgres=CTc/postgres
template1 | postgres | UTF8 | C | C | =c/postgres +
| | | | | postgres=CTc/postgres
(3 行)
———
(1)ユーザ(”testuser”)とデータベース(”testdb”)を作成します。
$ createuser --login --pwprompt testuser
新しいロールのためのパスワード:
もう一度入力してください:
(2)testuserがオーナの データベース testdbを作成
$ createdb --owner=testuser testdb
設定変更:外部からの接続を許可する
PostgreSQLはデフォルトではリモート接続できないので、設定を変更します。
(1)postgresql.confを修正
$ vi /pg-data/postgresql.conf
※デフォルトでは「/var/lib/pgsql/15/data/postgresql.conf」
変更前)
#listen_addresses = ‘localhost’
変更後)
listen_addresses = ‘*’
(2)次にpg_hba.confを修正します
# vi /pg-data/pg_hba.conf
※デフォルトでは「/var/lib/pgsql/15/data/pg_hba.conf」
# “local” is for Unix domain socket connections only
# ローカルからtestdbへtestuserでmd5接続できるように1行追加。
local testdb testuser md5
local all all peer
設定変更をリロードします。
$ pg_ctl reload
※ もしくはsystemctl reload postgresql-15
(3)ローカルからの接続確認
$ psql testdb testuser
ユーザ testuser のパスワード:
psql (15.2)
“help”でヘルプを表示します。
testdb=>
テーブルを作成して、データを投入してみます。
testdb=> create table TESTTBL01 (val1 int, val2 int);
CREATE TABLE
testdb=> insert into TESTTBL01 (val1, val2) values (1, 1);
INSERT 0 1
testdb=> insert into TESTTBL01 (val1, val2) values (2, 2);
INSERT 0 1
testdb=> select * from TESTTBL01;
val1 | val2
——+——
1 | 1
2 | 2
(2 行)
「\d」でテーブルの一覧、「\du」でロールの一覧を表示します。
testdb=> \d
リレーション一覧
スキーマ | 名前 | タイプ | 所有者
———-+———–+———-+———-
public | testtbl01 | テーブル | testuser
(1 行)
その他の設定変更
PostgreSQLのデフォルトのパラメータの値が、全体的に小さめに設定されています。
共有バッファだけ128MBから1024MBに変えてみました。
PostgreSQLの設定値を見積もってくれるサイトがあります。パラメータの参考値になります。あくまでも参考です。
PGTune(PostgreSQLのパラメータ)
4GB物理メモリを指定した場合です。
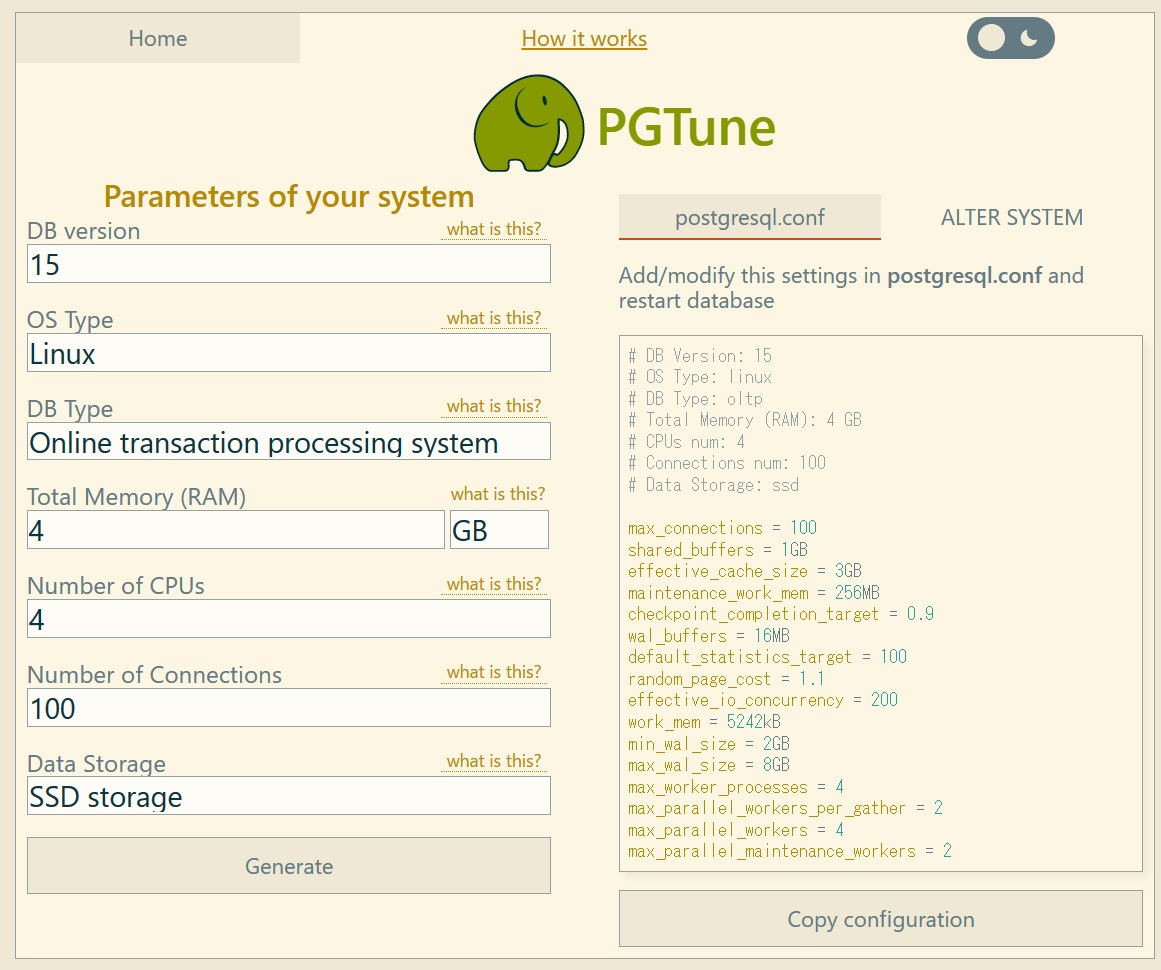
shared_buffer = 1GB, effective_cache_size=3GB, wal_buffers=16MB ぐらいを設定します。
変更方法は以下のとおりです。
# vi /pg-data/postgresql.conf
※デフォルトでは「/var/lib/pgsql/15/data/postgresql.conf」
あとはPostgreSQLを再起動するだけです。
ログの設定
★これは参考。デフォルトのログの出力がやや使いずらいので変更。
$ vi /pg-data/postgresql.conf
変更後は以下のとおり。
log_filename = ‘postgresql-%Y-%m-%d_%H%M%S.log’
log_rotation_size = 1GB
log_min_duration_statement = 500ms
log_checkpoints = on
log_connections = on
log_disconnections = on
log_lock_waits = on
log_temp_files = 0
pgbenchベンチマークを実施
PostgreSQLではベンチマーク用のツールpgbenchが標準で同梱されています。
まずは、pgbenchでベンチマーク用のテーブルとデータを作成します。
データの作成(初期化)
-i:初期化
-s:生成するデータ規模
$ pgbench -i -s 10 testdb
$ pgbench -c 10 -j 10 -t 2000 -N testdb
使用例
$ pgbench -i -s 10 testdb
dropping old tables…
NOTICE: table “pgbench_accounts” does not exist, skipping
NOTICE: table “pgbench_branches” does not exist, skipping
NOTICE: table “pgbench_history” does not exist, skipping
NOTICE: table “pgbench_tellers” does not exist, skipping
creating tables…
generating data (client-side)…
1000000 of 1000000 tuples (100%) done (elapsed 1.19 s, remaining 0.00 s)
vacuuming…
creating primary keys…
done in 2.00 s (drop tables 0.00 s, create tables 0.00 s, client-side generate 1.22 s, vacuum 0.40 s, primary keys 0.39 s).
$ pgbench -c 10 -j 10 -t 2000 -N testdb
starting vacuum…end.
transaction type:
scaling factor: 10
query mode: simple
number of clients: 10
number of threads: 10
number of transactions per client: 2000
number of transactions actually processed: 20000/20000
latency average = 1.690 ms
tps = 5916.615906 (including connections establishing)
tps = 5935.227066 (excluding connections establishing)
上の実行結果では秒間平均5900回のトランザクションが実行されたことが分かります。
pgbench のオプション補足
$ pgbench -i -s 10 testdb
$ pgbench -c 10 -j 10 -t 2000 -N testdb
-j threads
–jobs=threads
pgbench内のワーカスレッド数です。 複数のスレッドを使用することはマルチCPUマシンで有用になります。 クライアントは利用可能なスレッドの間でできる限り均等に分散されます。 デフォルトは1です。
・
試しにベンチマークを実行します。 以下ではPostgreSQLと10本のコネクションをはって、それぞれ1,000回のトランザクションを実行します。 つまり合計で10,000回のトランザクションが実行されます。
上の実行結果では秒間平均990回のトランザクションが実行されたことが分かります。
Scale=1000ぐらいが実用的な測定に近い
-s(スケール) 1000ぐらいが、DBのファイル が15GBぐらいで実用的な測定に近いです。
$ pgbench -i -s 1000 testdb
$ pgbench -c 10 -j 10 -t 10000 -N testdb
starting vacuum…end.
transaction type:
scaling factor: 1000
query mode: simple
number of clients: 10
number of threads: 10
number of transactions per client: 10000
number of transactions actually processed: 100000/100000
latency average = 3.399 ms
tps = 2941.779534 (including connections establishing)
tps = 2942.635141 (excluding connections establishing)
■15GB
$ du -hs /pg-data/*
4.0K /pg-data/PG_VERSION
15G /pg-data/base
リリースの利用状況も確認
(a)pgbench実行後にPostgreSQLのバッファのヒット率などを確認
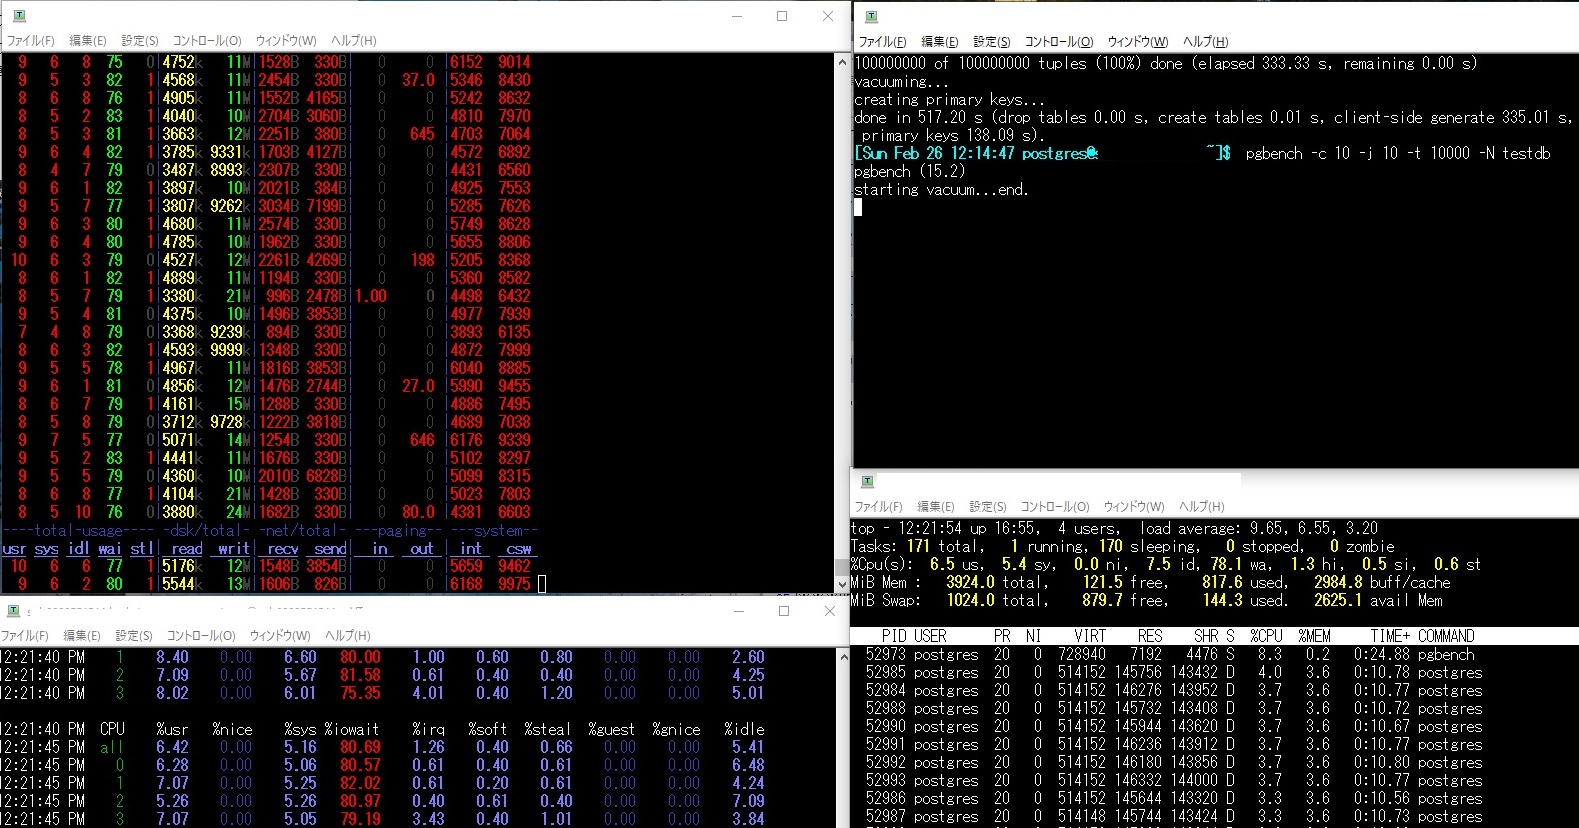
(b)pgbench実行中にCPU使用率、ディスクI/Oなどを確認してチューニングが正しいかも確認
$ psql testdb testuser
testdb=>
select relname,
round(heap_blks_hit * 100 / (heap_blks_hit+heap_blks_read), 2)
as cache_hit_ratio from pg_statio_user_tables
where heap_blks_read > 0 order by cache_hit_ratio;
relname | cache_hit_ratio
——————+—————–
pgbench_accounts | 63.00
testtbl01 | 66.00
pgbench_branches | 82.00
pgbench_tellers | 95.00
pgbench_history | 99.00
(5 行)
インデックスのキャッシュヒット率は以下のとおり。
testdb=>
select relname, indexrelname,
round(idx_blks_hit * 100 / (idx_blks_hit + idx_blks_read), 2)
as cache_hit_ratio from pg_statio_user_indexes
where idx_blks_read > 0 order by cache_hit_ratio;
relname | indexrelname | cache_hit_ratio
——————+———————–+—————–
pgbench_tellers | pgbench_tellers_pkey | 0.00
pgbench_branches | pgbench_branches_pkey | 50.00
pgbench_accounts | pgbench_accounts_pkey | 98.00
(3 行)
画面の左上:dstat、左下:mpstat、右上:pgbench実行、右下:top (-P)
最後に
PostgreSQLは専用の性能測定ベンチマークが提供されていてすぐに使えるので便利ですね。